💳 Payments
ExtensionFast uses Stripe for payments and Firebase for backend processing. This guide walks you through how to set up everything from scratch — no backend experience required.
🧾 What We’ll Set Up
- A Stripe product with at least one price to charge users
- A Firebase project with Firestore + Functions
- A Stripe webhook that talks to your Firebase backend
- A working system to know who paid and who hasn’t
🧪 Stripe Test Mode vs. Live Mode
Stripe provides both a Test Mode and a Live Mode.
- Test Mode: This allows you to simulate payments and webhook events without using real money. It’s crucial for development and testing your integration thoroughly. You’ll use separate test API keys and webhook secrets for this mode.
- Live Mode: This is when you’re ready to accept real payments from your users. You’ll switch to your live API keys and webhook secret.
It’s highly recommended to do all your initial setup and testing using Stripe’s Test Mode before switching to Live Mode. This will help you identify and fix any issues without affecting real customers.
You can toggle between Test and Live modes in your Stripe dashboard using the switch in the top left corner.
1. Stripe Setup
First, create a Stripe account at https://stripe.com .
Once you’re in:
Navigate to the Product Catalog
Once inside your Stripe dashboard or Stripe test dashboard, you can navigate to your Product Catalog on the left-hand sidebar
Create a product
This is what users will pay for (like “Extension - Basic” and/or ”Extension - Advanced”).
Create a price for your product
By navigating inside your product, you now have the ability to create a price with the ’+’ sign next to “Pricing”.
This defines how much and how often users will pay (one-time or recurring). Make sure to note the price_id of this price (By clicking on the price after created and scrolling down), you will need it in your application to initiate the checkout.
Grab your API key
Go to the Developers > API keys or Developers > API keys (Test) section.
Copy the key
Copy your Secret key — you’ll need this for Firebase.

2. Firebase Setup
Go to https://console.firebase.google.com and create a new project.
Once your project is ready:
Create a Firebase Project (if you haven’t already)
- Go to Firebase Console and create a new project (or use your existing project).
- Fill out your project name.
- You’ll be prompted for both Gemini and Google Analytics, these aren’t necessary for setup.
Enable Firebase Functions — this runs backend code.
- From the Firebase console, navigate to Build > Functions
- Click on the button to “Upgrade project”
- Create a Cloud Billing account
⚠️ You’ll need to add billing information to use functions.
- Don’t worry: Firebase has a very generous free tier that you’ll likely stay within unless you’re making significant revenue.
- You can set a budget cap (e.g. $1) in case of emergencies.
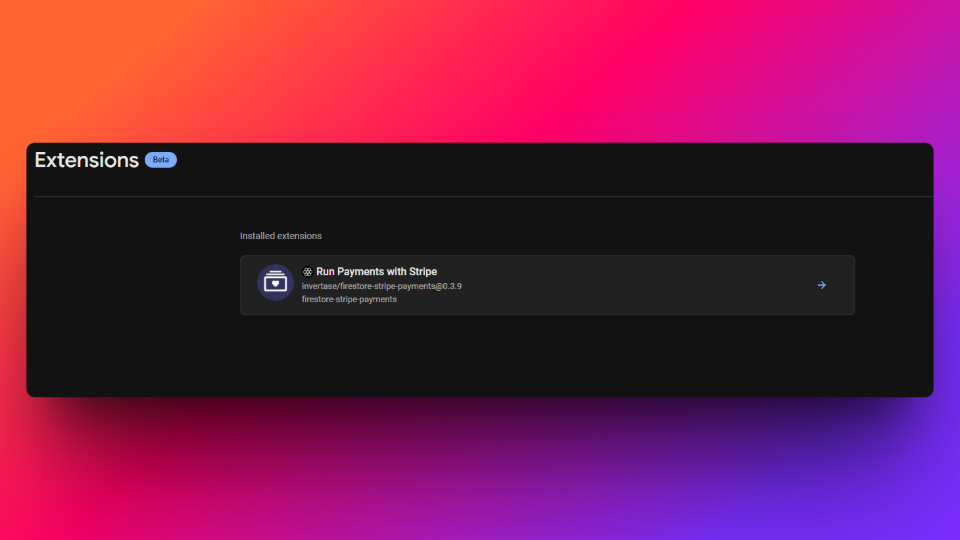
Add the Stripe Extension
Firebase makes payments easy with their official Stripe extension.
To add it:
- In the Firebase console, go to Build > Extensions
- Click on ”Explore Extensions Hub”
- Search for “Run payments with Stripe” (Made by Invertase)
- Click Install
- You’ll be prompted to enable services, you can enable those to proceed
- When prompted, paste your Stripe Secret key under Stripe API key with restricted access and click “Create Secret”
- Click Install extension to install the extension
The extension used inside Firebase (Run Payments with Stripe) automatically creates and manages the following Firestore (Firebase database) paths:
-
/products/{productId}Stores product information from Stripe. Used to list available products for users. -
/products/{productId}/prices/{priceId}Stores prices for each product. Required for setting up payments or subscriptions. -
/customers/{uid}Links a Firebase Auth user to a Stripe Customer. Central to managing user billing. -
/customers/{uid}/checkout_sessions/{sessionId}Used to create and track Stripe Checkout sessions. Triggers Stripe to create a checkout flow. -
/customers/{uid}/subscriptions/{subscriptionId}Stores subscription data for the user. Helps track active plans and billing status. -
/customers/{uid}/payments/{paymentIntentId}Logs one-time payments made by the user. Useful for purchase history and receipts.
After it’s done installing, Firebase will give you a Webhook URL — copy this!
3. Create the Webhook in Stripe
Now go back to Stripe to let it talk to your Firebase backend.
Follow the Firebase extension documentation
Once done downloading, navigate to “How this extension works” from the left-hand side of the Firebase extension and scroll down until you see “Configure Stripe webhooks”, follow this guide that the Firebase extension lays out.
Right now, you should be following what the guide says to do, and come back here afterwards.
For the webhooks section, go to the Developers > Webhooks or Developers > Webhooks (Test) section.

4. Add Webhook Secret to Firebase
Go back to Firebase:
Open the Firebase Extension
Click on the Firebase extension, pressing “Manage” on the right-hand side of the installed extension.
Navigate to “Extension configuration” and reconfigure
Once inside the Firebase extension, click on the “Extension configuration” on the left-hand sidebar.
Click the “Reconfigure extension” button.
Paste your Webhook Secret
Search for the “Stripe webhook secret (Optional)”, click “Show”, paste your webhook secret, and confirm.
Save and redeploy if prompted
Scroll up and click on the “Save” button.

5. Firestore Security Rules for “Run Payments with Stripe” Extension
To safely manage user and payment data, it’s important to limit access in Firestore. These rules help ensure that:
- Users can only read or write their own data.
- Sensitive Stripe customer data is protected.
- Product and pricing information is publicly accessible.
6. Add these rules to your Firestore rules:
Navigate to your Firebase Firestore
From the console, go to Build > Firestore Database
Go to the “Rules” tab
On the top sidebar, click on the tab that says “Rules”
Replace the Rules
Copy and paste this code block inside of the rules, and “Publish” them for security purposes.
rules_version = '2';
service cloud.firestore {
  match /databases/{database}/documents {

    // Users collection (if you're managing user documents)
    match /users/{docId} {
      allow create: if request.auth != null && request.auth.uid == request.resource.data.uid;
      allow read, update, delete: if request.auth != null && request.auth.uid == resource.data.uid;
    }

    // Stripe customer data linked to Firebase users
    match /customers/{uid} {
      allow read: if request.auth.uid == uid;

      // Stripe checkout sessions
      match /checkout_sessions/{id} {
        allow read, write: if request.auth.uid == uid;
      }

      // Stripe subscriptions
      match /subscriptions/{id} {
        allow read: if request.auth.uid == uid;
      }

      // Stripe payments (one-time purchases)
      match /payments/{id} {
        allow read: if request.auth.uid == uid;
      }
    }

    // Public product catalog from Stripe
    match /products/{id} {
      allow read: if true;

      // Pricing options for each product
      match /prices/{id} {
        allow read: if true;
      }

      // Tax rate info if used
      match /tax_rates/{id} {
        allow read: if true;
      }
    }
  }
}
Checkout Session Redirects
When a payment is successful or unsuccessful after initiating the Stripe checkout session, the user will be redirected to a success/unsuccesful screen, these are already set for your convenience:
- Success - https://extensionfast.com/extension/success
- Unsuccessful/Cancel - https://extensionfast.com/extension/cancel
If you would like to change these redirect screens to your own website, there are variables inside info.ts where you can place your own links.
That’s it! You now have a full payment pipeline that:
- Lets users pay with Stripe
- Uses Firebase Functions to handle success/fail
- Stores one-time payment info in the Firestore
- Stores subscription payment info in the Firestore
✅ Recap Checklist
- Stripe account created
- Product added in Stripe
- Firebase project set up
- Firestore + Functions enabled
- Stripe extension installed in Firebase
- Webhook created in Stripe with Firebase URL
💬 Additional Resources
- Firestore documentation – For more documentation from Firebase
- Stripe documentation – For more documentation from Stripe